How to Clean a Stainless Steel Fridge Without Ruining the Finish
The most expensive appliance in your kitchen usually looks its worst on Sunday morning. Fingerprints along the handle, a smeared palm print near the ice dispenser, a streak of what might be salsa near the top hinge. You grab the first spray bottle under the sink, attack it with a paper towel, and somehow leave it looking more streaked than before.
Here’s the thing nobody tells you about how to clean a stainless steel fridge: the product matters less than the method. You can own the most expensive cleaner on the shelf and still wreck the finish if you wipe wrong, use the wrong cloth, or skip the final buff. This is a craft, not a chore — and once you learn it properly, you’ll never fight streaks again.
Why Your Fridge Keeps Looking Terrible
Stainless steel isn’t a single material. It’s a steel alloy coated with a thin, invisible layer of chromium oxide that gives it the soft sheen and fingerprint-resistance you paid for. That layer is tough, but it’s also directional — the metal is rolled with a visible “grain,” tiny parallel lines running horizontally or vertically across the surface.
Every streak, every cloudy patch, every fingerprint halo comes down to one of three things:
- Wiping against the grain, which pushes residue into the directional micro-grooves instead of along them.
- Using the wrong cloth, which leaves lint, fibers, or micro-scratches.
- Skipping the buff step, which lets cleaner dry on the surface and cure into streaks.
Fix those three, and your fridge will look better with vinegar and water than your neighbor’s fridge with a fifty-dollar bottle.
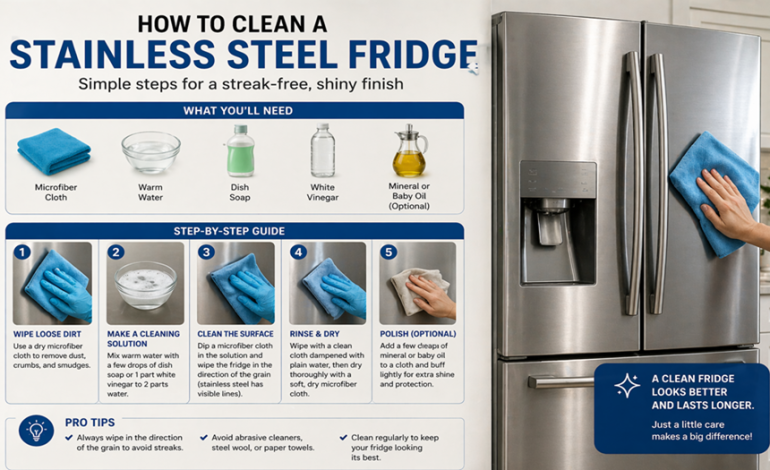
The Right Supplies (You Probably Already Own Most of Them)
Budget setup — under $10 total
- A spray bottle
- White vinegar
- Mineral oil, baby oil, or olive oil
- Three microfiber cloths (one wet, one dry, one for oil)
That’s it. This is the setup professional cleaners use when nobody’s watching. Vinegar cuts grease and fingerprints without damaging the chromium layer. Oil fills microscopic scratches in the brushed finish and repels fingerprints for days.
Mid-tier setup — $10–20
Weiman Stainless Steel Cleaner & Polish, Method Stainless Steel Cleaner, or Therapy Stainless Steel Cleaner. All three are ammonia-free, contain conditioning oils, and leave a real protective layer. Weiman is the workhorse, Method smells cleanest, Therapy has the best ingredient list.
Premium setup — $25+
3M Stainless Steel Cleaner & Polish (the commercial-grade version used in restaurant kitchens) or Hope’s Perfect Stainless. These are what show up in maintenance kits for Sub-Zero, Wolf, Miele, and Thermador appliances. If you spent five figures on a fridge, don’t clean it with anything from a blue bottle.
The one tool that matters most
Microfiber cloths. Non-negotiable. Paper towels leave lint and cause micro-abrasions. Cotton towels shed. Old t-shirts shed even more. Microfiber cloths — the kind with a tight weave, not the fluffy “dusting” kind — are what separate a professional finish from a streaky mess. Keep at least six in rotation, wash them without fabric softener (which coats the fibers), and retire them when they start to pill.
The Step-by-Step Method
Step 1: Find the grain
Get close to your fridge and look at the surface under direct light. You’ll see faint parallel lines running in one direction — usually horizontal on fridge doors, vertical on side panels. That’s the grain. Every single wipe from here on goes along those lines, never across them.
Step 2: Start with the easy pass
Spray your chosen cleaner onto a microfiber cloth — never directly onto the fridge. Liquid sprayed straight onto the appliance seeps into door seals, control panel gaps, ice dispenser mechanisms, and screen edges. Wipe a section roughly 18 inches wide in long, overlapping strokes along the grain. Work top to bottom so drips don’t fall onto cleaned areas.
Step 3: Tackle the problem zones
The handle is where every fridge ages first. It collects the most oil, gets touched hundreds of times a week, and almost always looks worse than the rest of the door. Clean it twice — once with the main wipe, then a second pass with a fresh section of cloth.
For dried food splatters or sticky residue, don’t scrub. Lay a damp microfiber over the spot for 60 seconds to let it soften, then wipe along the grain. Scrubbing — especially with anything abrasive — is how brushed stainless gets permanent cloudy patches.
Step 4: Buff immediately
Follow behind the wet cloth with a second, completely dry microfiber. Buff along the grain using firm, even pressure. This step is what 90% of people skip, and it’s exactly why their fridges look streaky. Cleaner that sits on the surface and air-dries will streak. Cleaner that gets buffed off while still slightly damp will not.
Step 5: Oil the finish
Put a dime-sized amount of mineral oil (or whatever polish you chose) onto a third, dry microfiber cloth. Rub it between your palms to distribute, then buff the entire fridge along the grain. Less is more — you’re not coating the fridge, you’re conditioning it. Finish with an empty pass using a clean section of the same cloth to remove any excess.
Step 6: Check from across the room
Streaks only show at specific angles. Walk away, turn around, and look at the fridge from eight or ten feet back under your normal kitchen lighting. If you see haze or streaking, one more dry-buff pass will almost always fix it.
Mistakes That Quietly Wreck Your Fridge

- Original blue Windex. The ammonia slowly degrades the chromium oxide layer. One use won’t ruin anything, but repeated use over months dulls the finish permanently.
- Bleach or chlorine-based cleaners. Far worse than ammonia. Chlorine can cause actual pitting and rust spots on stainless steel, despite the name.
- Magic Erasers. They feel soft but are technically a melamine foam abrasive. They’ll dull brushed finishes over time.
- Spraying directly onto the fridge. Cleaner seeps into seams, gaskets, ice dispensers, and touch controls. Always spray the cloth.
- Paper towels. They shed, scratch, and leave lint in the grain. Switch to microfiber and you’ll eliminate half your streak problems instantly.
- Cleaning a warm fridge. If your fridge has been running hard or the motor area is warm to the touch, cleaner evaporates too fast and leaves mineral residue. Wait for the surface to be cool.
- Skipping the oil step. Cleaning without conditioning gets you one clean day. Cleaning plus oil gets you a week or more of fingerprint resistance.
- Polishing a brand-new fridge. Most new appliances ship with a factory protective film that shouldn’t be oiled over. Read the manual — if there’s a factory coating, let it do its job for the first few weeks.
Frequency: How Often Is Right?
This is where most cleaning guides overcorrect.
- Daily or every other day: Quick dry-microfiber wipe of handles and any obvious smudges. Takes 30 seconds.
- Every 2–3 weeks: Full clean with your cleaner of choice, buff, and oil.
- Monthly: Deep clean including door gaskets (wipe with a damp cloth — they collect crumbs), top of the fridge (dust buildup), and underneath if your fridge rolls out.
- Seasonally: Vacuum the condenser coils at the back or bottom of the unit. This isn’t cosmetic — dirty coils make the motor work harder and shorten the fridge’s life.
Cleaning more often than this doesn’t help and can actually cause oil buildup, which makes the finish look streakier over time.
Frequently Asked Questions
What’s the best way to clean a stainless steel fridge without streaks?
Spray a vinegar-and-water mix onto a microfiber cloth, wipe along the grain, buff immediately with a second dry microfiber, and finish with a light coat of mineral oil on a third cloth. The combination of correct direction, microfiber material, and immediate buffing eliminates streaks almost entirely.
Can I use Windex to clean my stainless steel fridge?
Original blue Windex contains ammonia, which gradually damages the protective chromium layer on stainless steel and causes streaking. Ammonia-free Windex is safer but still not ideal — it’s formulated for glass, not brushed metal. A dedicated stainless steel cleaner or a vinegar-and-water mix will give noticeably better results.
Does vinegar actually work on stainless steel?
Yes, and it’s one of the best DIY options. Equal parts white vinegar and water dissolves fingerprints and grease without damaging the finish. The key is to follow it with mineral oil or a similar polish to condition the surface — otherwise the fridge will be clean but look dry and slightly dull.
How do I remove stubborn fingerprints from a stainless steel fridge?
Spray a small amount of cleaner or vinegar solution on a microfiber cloth, hold it on the fingerprint for 30 seconds to soften the oil, then wipe along the grain. Never scrub or use abrasives. Following up with a mineral oil buff will also make the surface fingerprint-resistant for several days.
What’s the best cleaner for a high-end stainless steel fridge like Sub-Zero or Wolf?
Use the manufacturer-recommended cleaner if one came with the appliance, or 3M Stainless Steel Cleaner & Polish (commercial grade) or Hope’s Perfect Stainless. Avoid all ammonia-based cleaners, abrasives, and Magic Erasers. Premium appliances have the same chromium oxide layer as budget ones — what differs is the finish quality, which is exactly what you want to preserve.
Why does my stainless steel fridge look worse after I clean it?
Three likely causes: you wiped against the grain, you used a paper towel or cotton cloth that left lint, or the cleaner dried before you buffed it. Switch to microfiber, work in small sections along the grain, and buff immediately with a dry cloth. The improvement is usually obvious from the first wipe.
The Takeaway
Learning how to clean a stainless steel fridge isn’t about finding a magic product. It’s about respecting the surface you’re working with — a brushed metal with a direction, a delicate protective layer, and specific needs that most generic cleaners ignore.
Wipe along the grain. Use microfiber, always. Buff while still slightly damp. Finish with oil. Skip the ammonia, the bleach, the Magic Erasers, and the paper towels. Do this every two or three weeks and your fridge will look better at year five than most fridges look at month six.
That’s the whole method. No miracle product required — just the right technique, consistently applied.